

The Cockroach Tarpon Fly by Jason Akl
article copyright
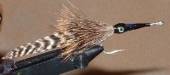
The Cockroach fly pattern is not a mystery to serious salt-water anglers. Developed by legendary fly tier Lefty Kreh, this fly has accounted for many trophy tarpon being landed over the years and is still just as effective today. The cockroach fly can be used in both clear/ dark waters, and when sight or blind casting. This is a true must-have for any serious Tarpon trip.
The Cockroach pattern is one of the true classic saltwater flies that imitate many different types of food sources for tarpon. The sleek profile and darting action mimic many of the smaller bait-fish found on the flats. But at the same time, the barred grizzly hackle tail and bucktail collar represent shrimp, small lobster and other crustaceans. Tarpon patterns range anywhere from one inch to over a foot in length. As a general principal to follow: the bigger the fish you are chasing the bigger the fly should be. These super-sized predators need a food source that makes it worth chasing after. A big tarpon cannot afford to expend a large amount of energy chasing after a bait-fish if the prey is too small.
Tarpon are known for their enormous bucket mouths that seem to be made up of bone on top of bone. If there is any time you want to spend money on a quality hook it should be for tarpon flies. A heavy-duty hook shank and extremely sharp hook point are a good start towards getting a hook-set that will hold, after that the rest is up to you.
Materials used in the Cockroach Fly Pattern
Hook: Daiichi Salt Water Hook Size 4
Tail: Grizzly Hackles
Collar: Buchtail
Head: Black Thread and Epoxy
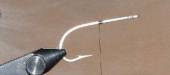 1. Start this fly by placing your hook into your vice securely and attaching the thread at the mid point of the hook shank.
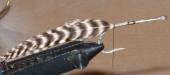 2. Select 6 grizzly hackles from the skin that closely resemble each other in size and shape. Make two separate groups of three feathers and place the feathers one on top of each other (convex sides together). Strip off the last inch or so of the hackle fibers and make a few turns of threads over the stripped shafts to hold them on in place. If done correctly the actually webby parts of the hackle should start at the point above the barb on the hook shank. Repeat this process for the second group of feathers (making sure to place the convex sides of the two groups of feathers towards each other). Make a quick check to see that the feathers are nicely aligned and that all the feather shafts stayed above the hook shank during the tie down process. A drop of Dave’s flexament is a good idea here just to make sure the feathers will not move in the future.
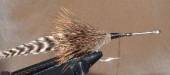 3. Clip and clean a small bunch of brown bucktail and place it into your hair stacker. Tap the stacker a few times until the hair tips have been aligned and remove the hair. With this first grouping of bucktail wrap it down on top of the hook shank with your thread making sure that you do not use too much thread pressure, just enough to allow the bucktail hair to spin slightly. Excessive thread pressure will cause the bucktail hair to flare wildly and that is not what you are looking for. After the hair is secured in place clip off the tag ends of the hair and invert the fly. Repeat this process with the bucktail for the bottom of the fly. When you are finished the bucktail should surround the tail of the fly completely.
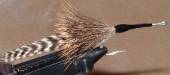 4. With the thread, build a nice tapered smooth head section for the fly and proceed to cover the rest of the hook shank with thread. Whip finish the thread at the back of the hook eye.
 5. Take your fly to your epoxy station and coat the entire head with 5-minute epoxy.
6. Allow the epoxy to dry completely and then stick a pair of prismatic eyes to each side of the head. A second coat of epoxy should be done to seal the eyes in place securely and even out any bumps or holes made with the first application of epoxy.
author website: visit | author bio
![]()