Better Buggers by Jason Akl
article copyright
For all of you fly tyers out there that are constantly looking for new and better ways to make your old trustworthy wooly buggers even better. Here is a little something to make you smile. Over the last few years that I have been tying, many different products have come to the forefront to make the life of fly tyers easier and their respected flies look better. Some of these products that I am mentioning are leech mohair yarns, dubbing teasers and synthetic chenille’s. As good as these products are, nothing can compare to what seems to be the new fad in the fly tying community: fur hackles. Adding a fur hackle to your favorite bugger pattern can do many things, it will add extra body giving a bigger profile to a wet fly, it will increase the flies action in the water and definitely fur hackles increase the flies durability.
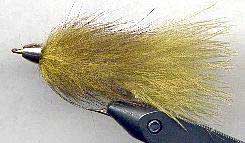
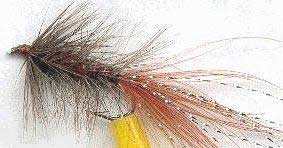
Take a look at the two flies shown below:

1. Regular Brown Wooly Bugger

2. Fur Hackle Olive Wooly Bugger
You can see the difference easily between the two flies, one looks full and stout and the other slim and long, even though they were both tied on the same size hooks. Don’t get me wrong; I am not saying that there is no place for the regular brown bugger pattern, but when hunting lunker trout you have to sometimes size things up a bit to their fancy. I personally switch to these dense fur hackle types of patterns in early spring and late fall. The big lake runners come out of the lakes and enter the streams these two times a year and it is a perfect chance to present these fish with a nice sized meal they will find hard to resist.
Looking at the technique of adding fur hackles is another advantage to tyers, many flies can be tied in a short amount of time once a tier gets the hang of using hair clips and forming dubbing loops. The fur used to make the fur hackle can come from many different places. For beginners I suggest using a small portion from a zonker strip. This will help beginners to see how much is needed to be placed into the hair clip and how to properly align the tips so that the hackle will come out even. Once you become more experienced in using the hair clip and spinning fur hackles from zonker strips you can start using different patches of fur to make your hackles. I like to use patches of dyed rabbit fur, simply combing the fur until the tips are even, then placing it into the clip. When looking at cost of production, fur hackles are very cheap as compared to using cactus chenille’s and synthetic dubbings. Enough fur is included in an average pack of zonker strips to tie anywhere from 25 to 30 flies.
Materials Used in the Conehead Fur Hackle Wooly Bugger
Hook: Mustad Size 4
Thread: Olive Uni-thread Size 6/0
Body: Olive Rabbit Fur
Tail: Olive Marabou
Head: Chrome Conehead Bead
1) Start this fly by sliding a conehead bead tapered end first over the hook point and push it until you reach the back of the hook eye. Attach your thread to the hook shank like you would on any other fly and take a few turns behind the cone to lock it in place. Next, select a small bunch of marabou for a tail and tie it securely to the top of the hook shank. Wrap the marabou with thread evenly down the hook shank until you reach the point above the barb. Make sure that as you wrap the marabou it does not spin around the hook and end up on the bottom of the shank.
2) With your thread at the rear of the hook shank, form a thread loop with your bobbin and place your loop tool hanging in the loop. Now with your bobbin, bring the thread back over the hook shank on the same side that you drew the thread loop from. With your loop tool now hanging and placing pressure on the dubbing loop take your thread and wrap it in the front and back of your loop to tie it off. With the loop securely in place advance your thread to the back of the conehead. Taking a few minutes away from your vise, select approximately a one-inch portion of rabbit fur from a zonker strip. Place this one-inch fur strip into a paper holder clip evenly and cut away the rawhide (Hint: Leave about ¼ to ½ of an inch of fur sticking out of the paper clip to make it easier to place in the dubbing loop).
3) Take the fur strip and now place it into the loop. Apply slight pressure with the loop tool and release the fur from the clip. With the fur hanging on it’s own, you now have the chance to even out any of the fur that might have slipped and is not even with the other fur’s tips. At this step you must also decide what length you will leave the butt ends of the fur. Remember the longer you leave the butt ends the thicker and darker the fur hackle will be (the ends help build a sort of a collar of fur, so the longer you leave the butt section the heavier the collar will be.)
4) With the fur tips even and the butt ends being the length you want them to be, apply a little more pressure with you loop tool and give it a quick spin. Don’t worry the fur is not going to fall out or tangle around itself. If any snags do occur then simply prick them out with your bodkin. With the fur now spun, the loop should most closely resemble a rather large green pipe cleaner, except much softer.
5) Wet your fingers and slick the fur backwards in one direction to organize the fur hackle for wrapping. You can wrap the hackle as is, but making all the fur tips aligned makes it much easier. As you wrap the hackle forward up the hook shank, carefully keep combing the hair towards the rear of the fly so it does not cover over the tips of the preceding wraps of fur.
6) Depending on the type of hook you selected to tie this fly; you might need to make 2-3 different fur hackles to cover the entire length of the hook shank. Stop at the rear of the cone leaving room for whip finishing. Try and use as few thread wraps as possible when whip finishing this fly pattern. You want the fur hackle to come as close to the back of the cone as possible so, the less thread build up the better. Make sure to cement the fly thoroughly, after you are done whip finishing the fly, the last thing you want is for the hackle to come loose and start unwinding.
author website: visit | author bio
![]()

